Many homeowners find themselves staring at blank walls, feeling overwhelmed by the empty space and unsure how to fill it meaningfully. This common decorating challenge has a versatile solution. Gallery walls offer a practical way to add personality and warmth to any space, allowing for personal expression through thoughtfully arranged collections of images. Unlike single large artworks, these curated displays tell a unique story through multiple pieces working together. Whether using family photographs, art prints, or an eclectic mix, the following guidance will help create an intentional display that makes a house feel like home.
Planning Your Gallery Wall Layout
The difference between a gallery wall that captivates and one that feels disorganized often comes down to careful planning before any hanging begins.
Measuring and Mapping Your Space
Starting with precise measurements creates a solid foundation for any gallery wall project. Homeowners should identify the boundaries of their display area by considering ceiling height and furniture placement. For most living spaces, keeping the bottom edge of the gallery about 8-10 inches above furniture works well. Without furniture below, centering the arrangement at eye level (typically 57-60 inches from the floor) creates the most visually pleasing result.
Marking these boundaries with painter’s tape directly on the wall helps visualize the available canvas and prevents unnecessary wall repairs from misplaced holes later.
Choosing a Layout Style (Grid, Salon, Asymmetrical)
The chosen layout style establishes the overall feel of the gallery:
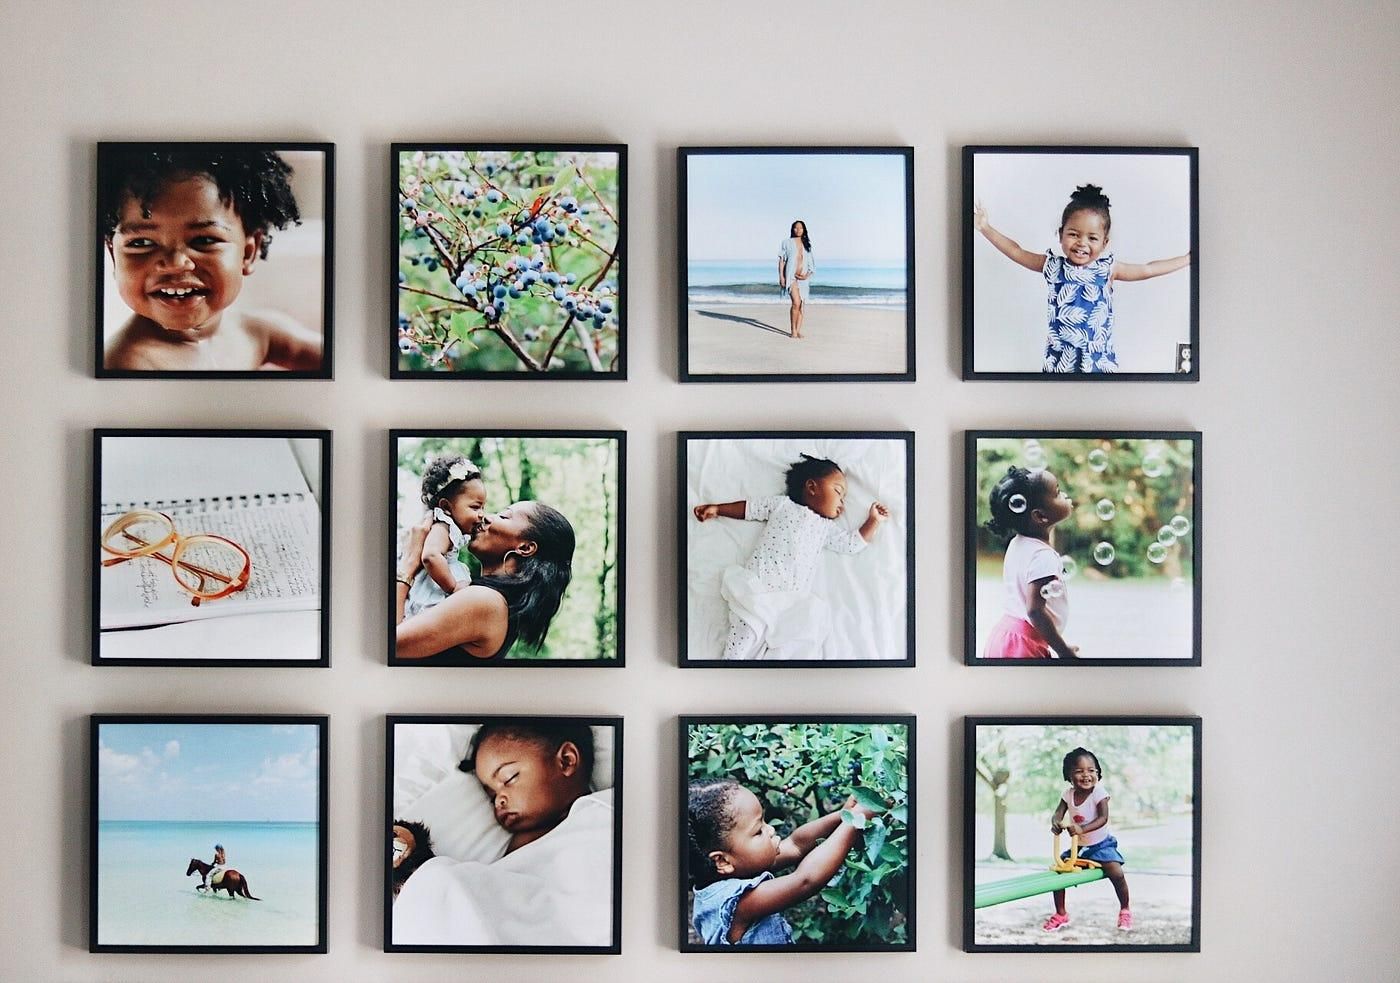
Grid layouts feature matching frames with consistent spacing, creating a formal, sophisticated appearance. This approach works particularly well in dining rooms or when displaying cohesive photo series.
Salon-style arrangements incorporate frames of various sizes hung close together, sometimes covering walls from floor to ceiling. This style creates a collected, lived-in atmosphere perfect for eclectic spaces and mixing personal photos with artwork.
Asymmetrical layouts offer balanced irregularity—not perfectly mirrored but still intentional. Most decorators find this style forgiving for beginners and easiest to expand over time as new pieces join the collection.
Creating Paper Templates for Trial Arrangements
Experienced decorators recommend tracing each frame onto kraft paper or newspaper, cutting out the shapes, and labeling each with its corresponding piece. Using painter’s tape to position these templates on the wall allows for experimentation without commitment.
Taking the time to play with different arrangements, stepping back frequently to assess the overall look, pays dividends in the final result. Photographing promising layouts before deciding on final placement provides helpful reference during installation. This preparation prevents walls full of misplaced nail holes and unnecessary frustration.
Selecting and Curating Your Artwork
The heart of any gallery wall lies in the selected pieces, where personal expression truly shines through.
Developing a Cohesive Color Story
While perfect matching isn’t necessary, a thoughtful color palette unifies a gallery wall. Consider these approaches:
– Choose artwork with 2-3 recurring colors throughout different pieces
– Select frames in complementary finishes (mixing metal tones works when each tone appears at least twice)
– Use black and white photos to create a timeless look compatible with any decor
For collections with widely varying colors, matching frames can create visual consistency that ties everything together.
Mixing Different Art Mediums
The most intriguing gallery walls often combine various art forms, such as:
– Framed photographs
– Watercolor paintings
– Simple line drawings
– Small textile pieces
– Pressed botanical specimens
Finding a common element—perhaps similar subject matter or color palette—maintains cohesion while embracing variety. Nature-inspired pieces in different mediums, for example, can create a beautiful theme despite varying textures and techniques.
Creating Personal Meaning Through Photo Selection
Photographs tell stories, so selecting images that spark joy or conversation creates more meaningful displays. Candid moments capturing genuine emotion often resonate more than perfectly posed portraits. Choosing images that represent milestones and memories rather than just aesthetically pleasing pictures creates deeper connection.
Creating mini-stories within the larger display adds another layer of meaning. Grouping vacation photos from the same trip or arranging a chronological family history section gives visitors glimpses into important life experiences.
Design Principles for Impact
Understanding basic design concepts elevates gallery walls from pleasant to stunning.
Scale and Proportion Guidelines
Scale refers to how the gallery wall relates to the room, while proportion addresses relationships between individual pieces. Larger walls benefit from including at least a few substantial pieces (16×20 inches or larger) to anchor the arrangement. Smaller walls work better with more modestly sized pieces.
Varying frame sizes typically creates more visual interest than identical dimensions. Professional decorators often suggest that the largest piece should be no more than twice the size of the smallest for a harmonious look.
Creating Visual Balance
Balance doesn’t require symmetry. When working with differently sized pieces, consider visual weight—larger or darker items feel “heavier” than smaller or lighter ones. Distributing these elements evenly throughout the arrangement creates stability.
For example, placing a large black-framed print on one side can be balanced by three smaller frames on the opposite side. The arrangement feels stable despite asymmetry because the visual weight distributes evenly.
Using Negative Space Effectively
The breathing room between pieces—called negative space—plays as important a role as the artwork itself. Maintaining 2-3 inches between frames typically creates a cohesive group while allowing each piece to shine individually.
For a more collected, casual look, tighter spacing works well. For a gallery that feels more formal or museum-like, increasing the distance between pieces creates that effect. Either way, consistent spacing throughout the arrangement creates a more professional appearance.
Practical Installation Solutions
The installation phase often intimidates even enthusiastic decorators, but the right approach makes it manageable.
Damage-Free Hanging Methods
Renters and those who prefer avoiding wall repairs have several excellent options:
– Command picture hanging strips work well for frames up to about 8 pounds
– Picture hanging strips with velcro components allow for easy leveling adjustments
– Adhesive hooks designed specifically for gallery walls support lighter frames
– Picture rails or molding with hanging wires eliminate wall damage entirely
These damage-free methods can achieve professional-looking results that remain secure for years.
Tools and Materials Needed
Having the right tools simplifies installation significantly:
– Laser level (or a traditional level and pencil)
– Tape measure
– Hammer and picture hanging nails (if not using adhesive methods)
– Painter’s tape for marking positions
– Step stool or ladder for reaching higher positions
– Helper for holding larger pieces (and providing a second opinion)
Keeping these supplies together in a dedicated “gallery wall kit” ensures readiness when inspiration strikes.
Professional-Looking Spacing Tips
Using a piece of cardboard cut to the desired spacing width (usually 2-3 inches) as a template between frames ensures consistent spacing throughout the gallery.
For multiple rows, establishing a horizontal guideline with painter’s tape or a level line helps keep everything aligned. When hanging pieces of varying heights, aligning either the centers or the tops/bottoms depending on the layout style creates visual harmony.
Modern Gallery Wall Solutions with Mixtiles
Gallery walls have evolved significantly from complicated hanging systems and permanent installations.
Customizable Photo Arrangements
Digital tools have simplified gallery wall creation. Services that allow users to upload photos and visualize different arrangements before ordering enable risk-free experimentation. This preview capability reduces stress, especially when working with family photos or meaningful images.
The ability to crop, filter, and adjust photos before printing ensures every image works harmoniously within the overall design, maintaining cohesion even with photos taken years apart or in different lighting conditions.
Renter-Friendly Installation Options
One significant innovation in gallery walls has been the development of truly damage-free mounting options. Adhesive-backed photo tiles apply and remove without tools or wall damage—particularly valuable for renters or those who refresh their decor frequently.
This freedom to adjust and rearrange without consequences makes experimenting with layouts much less intimidating, allowing for seasonal updates or accommodating new pieces without worry.
Mix-and-Match Design Possibilities
Contemporary gallery wall solutions often include complementary frame styles that work together while offering variety. This eliminates guesswork when mixing frames while still allowing for personalization.
Starting with a core collection of coordinated frames makes expanding the gallery wall over time simpler. Beginning with matching frames and gradually incorporating different styles while maintaining the original aesthetic creates a cohesive but evolving display.
Taking Your Gallery Wall Beyond Basic
Once comfortable with fundamentals, numerous options exist for creating truly exceptional gallery walls.
Incorporating 3D Elements
Moving beyond flat artwork adds significant interest to gallery walls:
– Small wall-mounted sculptures or ceramic pieces
– Shadow boxes containing meaningful objects
– Woven wall hangings or macramé pieces
– Small shelves displaying tiny collectibles or plants
Including a small floating shelf that holds changing seasonal items among framed pieces adds depth and dimension that purely flat displays cannot achieve.
Seasonal Rotation Strategies
Designating a few frames for rotating seasonal content keeps gallery walls fresh—family holiday photos in winter, bright botanical prints in spring, vacation snapshots in summer.
Creating a system for easy updates encourages regular refreshing. Magnetic frames or clip systems work particularly well for pieces planned for frequent changes, keeping the home feeling current without requiring complete gallery overhauls.
Lighting Your Gallery Display
Thoughtful lighting transforms good gallery walls into stunning focal points. Options include:
– Picture lights mounted above larger statement pieces
– Track lighting adjusted to highlight specific areas
– Puck lights for showcasing particular works
– String lights integrated into the arrangement for a warm glow
Even simple lighting upgrades create more professional, intentional displays with dramatic differences between day and night viewing.
Gallery walls should evolve as homeowners’ lives change. The beauty of this decorating approach lies in its ability to grow and change with life experiences, reflecting personal journeys through carefully selected images and artwork. These guidelines provide structure, but the most meaningful gallery walls often emerge when personal inspiration leads the way.