The idea of making your own shirt sounds straightforward until you start looking into it. There are at least seven distinct methods, each with its own equipment requirements, cost profile, design constraints, and quality ceiling. Some are genuinely beginner-friendly with no equipment required. Others demand technical skill, specialised machinery, and a reasonable upfront investment before you print a single shirt.
The good news is that the right method for you depends entirely on what you’re trying to accomplish, and once you understand what each approach actually involves, the decision becomes fairly clear.
This guide covers every meaningful method for making custom shirts, from the simplest home techniques to professional production workflows, with honest assessments of where each one works and where it falls short.
Start With the Right Question
Before choosing a printing method, the most useful question to answer is this: what are you actually trying to produce?
A single shirt for a birthday gift has completely different requirements from 200 event shirts for a corporate team, which has completely different requirements from an ongoing e-commerce store selling original designs to customers you’ve never met. The method that serves one of these purposes well can be genuinely impractical for another.
Three variables drive the decision: quantity, design complexity, and whether you want to manage physical production yourself. Run those three factors through the comparison below and your shortlist narrows quickly.
“The best shirt-making method isn’t the most technically impressive one. It’s the one that fits your quantity, your design, and the amount of time and money you’re willing to put into production.”
Method Comparison at a Glance
| Method | Best For | Upfront Cost | Durability | Skill Level |
| Print-on-Demand | Selling online, no inventory | None | High (professional print) | Beginner |
| Iron-on Transfer | One-off personal shirts | Low | Moderate | Beginner |
| Heat Transfer Vinyl | Bold, solid-colour designs | Medium | High | Beginner-Intermediate |
| DTG Printing | Detailed artwork, photos | High (equipment) | High | Intermediate |
| Screen Printing | Large bulk orders | High (setup) | Very High | Advanced |
| DTF Printing | Any fabric, small runs | Medium-High | High | Intermediate |
| Dye Sublimation | Polyester, all-over prints | Medium | Very High | Intermediate |
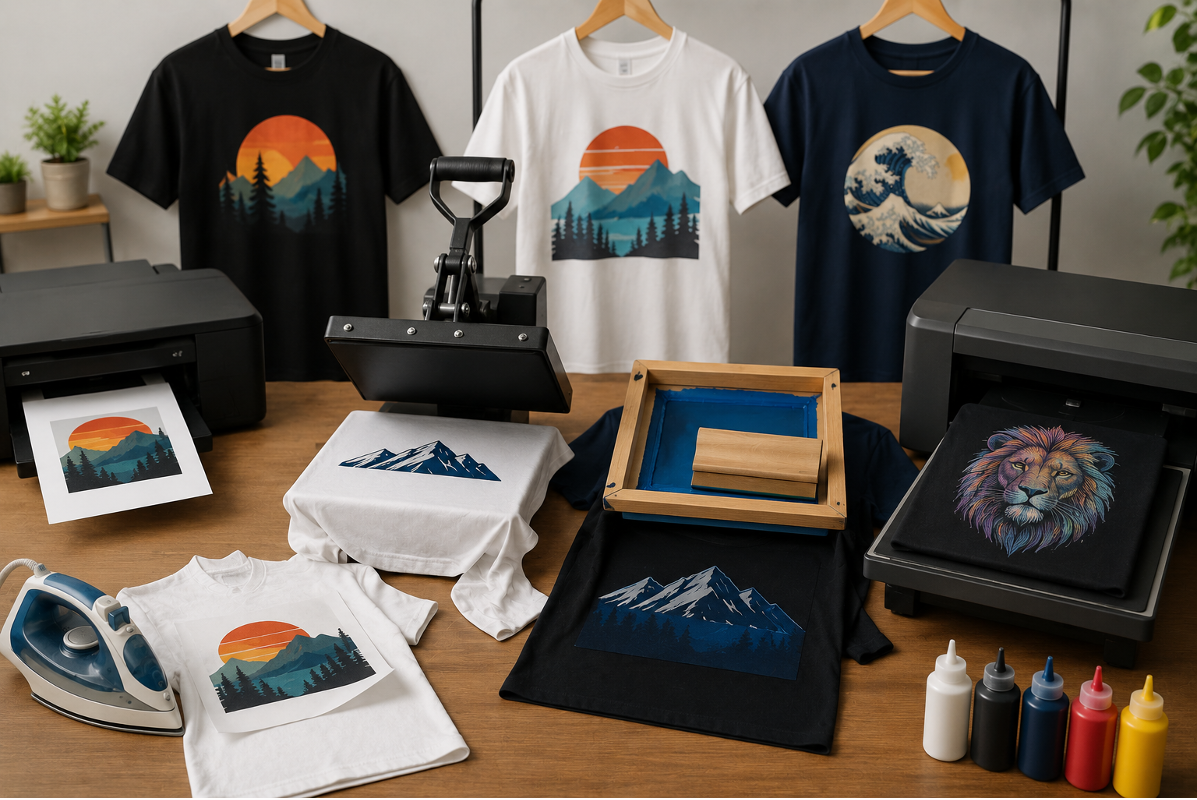
Method 1: Print-on-Demand (The Zero-Inventory Route)
Print-on-demand is the method that has changed custom apparel most significantly over the past decade. The basic model is simple: you create a design, upload it to a platform, connect it to an online store, and when a customer places an order, the platform prints and ships the shirt directly. You never touch the inventory. If you want to understand how to make your own shirts without investing in equipment or holding stock, this is where most people should start.
The practical benefits are significant. There’s no minimum order quantity, no upfront production cost, and no risk of being stuck with unsold inventory. Design files are uploaded once and the platform handles all fulfilment automatically. For someone building an online brand or testing whether a design concept will actually sell, this removes virtually all the financial friction of getting started.
Quality has improved considerably as the technology has matured. Modern DTG (direct-to-garment) printing, which most print-on-demand platforms use, produces sharp, vibrant results on cotton garments that hold up well through regular washing. The output is indistinguishable from professionally screen-printed shirts at normal viewing distances.
The trade-off is margin. Because the platform handles production and fulfilment, the per-unit cost is higher than bulk printing. If you’re selling at competitive retail prices, the profit per shirt is thinner than it would be with a bulk screen printing order. This is a real consideration for established brands selling at volume, but a non-issue for new sellers who aren’t yet moving hundreds of units per month.
What print-on-demand works best for:
- Launching an online store with no upfront investment
- Testing designs before committing to large production runs
- Selling to a global audience without managing international shipping yourself
- Running a design-focused brand where fulfilment is handled in the background
Method 2: Iron-on Transfers (The Home Starter Method)
Iron-on transfers are the entry point for anyone who wants to make a custom shirt at home right now, with minimal equipment. The process involves printing a design onto specialised transfer paper using a standard inkjet printer, then pressing it onto the fabric with a household iron or basic heat press.
The appeal is accessibility. Transfer paper costs very little, the process takes under an hour for a first attempt, and you don’t need any design experience beyond putting text or an image on a document. For a one-off personalised gift, an event shirt made the night before, or a test run of a design idea, iron-on transfers are entirely practical.
The limitations are real and worth understanding before you commit to this method for anything beyond personal use. The transfer layer sits on top of the fabric rather than bonding with the fibres, which means it will crack, peel, and fade faster than printed alternatives. Wash care matters a lot here: cold water, inside-out washing, and air drying extend the life considerably, but the print will not age the same way a DTG or screen-printed design does.
For dark fabrics, you need dark-fabric-specific transfer paper, and the process is slightly more involved. Always mirror your design before printing on light-fabric paper so it reads correctly after transfer. These are small details, but skipping them produces results that look like mistakes rather than design decisions.
What iron-on transfers work best for:
- Single shirts and small personal batches
- Gifts, family events, themed nights out
- Testing a design on actual fabric before ordering a proper print run
- Situations where equipment access and turnaround time are the main constraints
Method 3: Heat Transfer Vinyl (HTV)
Heat transfer vinyl sits a step above iron-on transfers in terms of durability and finish quality. Rather than printing a design onto paper, you cut the design from coloured vinyl sheets using a cutting machine (Cricut and Silhouette are the most widely used), weed out the negative space, and press the remaining vinyl onto the shirt using a heat press.
The result is a raised, slightly tactile print with clean edges and strong colour saturation. Because the vinyl bonds physically with the fabric fibres under heat and pressure, it holds up through repeated washing significantly better than standard transfer paper. Bold, flat-colour designs, text, numbers, and geometric shapes are where HTV performs at its best.
The limitation is design complexity. HTV is not suited to photographic images, gradients, or designs with many fine details. Each colour in the design requires a separate layer of vinyl, which means multi-colour designs become time-consuming to prepare and apply. For simple, graphic designs, it’s an excellent method. For detailed artwork, the other digital methods are better suited.
Entry cost is moderate. A basic cutting machine costs between $150 and $300, vinyl sheets are inexpensive, and a heat press (more reliable than a household iron for consistent pressure) runs from $100 upward. The setup cost pays off quickly if you’re producing shirts regularly.
What HTV works best for:
- Sports team kits and jerseys with names and numbers
- Staff uniforms with simple logo or text treatments
- Bold, graphic designs with flat colours and clean edges
- Small batch production where per-unit cost needs to stay low
Method 4: Direct-to-Garment (DTG) Printing
DTG printing is the professional version of inkjet printing applied directly to fabric. A specialised printer deposits water-based ink directly onto the garment surface, producing prints that are essentially photographic in quality. Complex artwork, full-colour illustrations, gradients, and photographic images are all within its capability.
For sellers and brands who need the highest quality output from digital artwork, DTG is the gold standard. There are no screens to set up, no minimum colour requirements, and no practical limit on design complexity. The print bonds with the fabric fibres rather than sitting on top of them, which gives it a softer, more natural hand feel than vinyl or transfer methods.
The barrier to in-house DTG printing is cost. Professional DTG printers start at around $10,000 and go significantly higher for commercial-grade equipment. Maintenance requirements are substantial, and the machines need consistent use to stay in good condition. For most individuals and small brands, owning a DTG printer is not the right approach. Accessing DTG printing through a print-on-demand platform or a local print shop is the practical route to the same output quality without the capital outlay.
Cotton and cotton-blend fabrics produce the best DTG results. Polyester and synthetic fabrics don’t absorb water-based inks well, which is why DTG and dye sublimation serve different markets.
What DTG works best for:
- Detailed artwork, photographic images, and complex illustrations
- One-off and small-run orders where screen printing setup costs aren’t justified
- Brands that prioritise print quality above all other production factors
Method 5: Screen Printing
Screen printing is the oldest and most established method in commercial apparel production, and for good reason. When the conditions are right, it produces the most durable, most vibrant results of any printing method, with a physical presence and colour saturation that digital methods don’t quite match.
The process involves creating a separate screen (stencil) for each colour in the design, applying ink through the screens onto the fabric in sequence, and curing the ink with heat. The setup process is labour-intensive and requires physical materials for each colour, which is why screen printing has minimum order quantities, typically 24 to 48 shirts at the low end, and becomes genuinely cost-effective at 100 units or more.
For established brands producing regular runs of branded merchandise, event organisers printing shirts in quantity, or sports teams ordering seasonal kit, screen printing offers the best cost-per-unit at scale and the most durable print result. For someone making a single shirt or selling in small batches, the economics don’t work.
Design constraints are real: screen printing handles flat colours and bold graphics well, but each additional colour adds cost and complexity. Photographic images and gradients require either halftone simulation techniques or a process called simulated process printing, both of which require experienced operators and add to the cost.
What screen printing works best for:
- Bulk orders of 50 or more units where per-unit cost matters
- Designs with 1 to 4 solid colours and bold graphic elements
- Long-lasting branded merchandise that needs to survive heavy use and frequent washing
- Corporate uniforms, team kits, and event shirts at scale
Method 6: DTF (Direct-to-Film) Printing
DTF is a newer method that has gained significant traction as an alternative to both DTG and screen printing for small to medium runs. The process involves printing artwork onto a special film using DTF inks, applying an adhesive powder, curing the film with heat, and then pressing the finished transfer onto the garment.
What makes DTF notable is its versatility. Unlike DTG, which works best on cotton, DTF transfers bond effectively with polyester, nylon, denim, leather, and blended fabrics. The print quality is high, handling detailed artwork and gradients without the fabric-type constraints of DTG. And unlike screen printing, there are no minimums and no screens to set up.
DTF printing equipment costs less than a professional DTG printer, which has made it popular with small print businesses and print-on-demand operations looking to offer a wider range of garment types. For consumers, DTF is most accessible through print shops and online custom apparel services that have invested in the equipment.
What DTF works best for:
- Designs that need to go on non-cotton fabrics
- Small runs with detailed or complex artwork
- Businesses offering custom printing across a wide range of garment types
Method 7: Dye Sublimation
Dye sublimation produces the most seamless integration of design and fabric of any printing method. The process uses heat to convert ink from a solid to a gas, which then bonds permanently with polyester fibres. The result is a print that becomes part of the fabric rather than sitting on top of it, with no texture, no raised edges, and no risk of cracking or peeling.
All-over prints, gradient backgrounds, photographic quality images, and designs that bleed to the edges of the garment are all achievable with sublimation in ways that other methods can’t match. Performance sportswear, cycling jerseys, and fashion pieces with edge-to-edge graphics are common applications.
The constraint is fabric. Sublimation only works on polyester and polyester-blend fabrics, and it produces the most vibrant results on white or very light base colours. On a dark polyester shirt, the colours wash out significantly. This limits sublimation’s usefulness for the cotton-based everyday wear market, but makes it the method of choice for activewear and technical apparel.
What dye sublimation works best for:
- All-over print designs on polyester activewear
- Performance sports kit and cycling apparel
- Edge-to-edge graphic designs on white or light base garments
Designing Your Shirt: Practical Considerations Before You Print
Whatever method you choose, the design file you submit for production needs to meet basic technical standards. Getting this right avoids the most common production problems.
Resolution
Print files should be 300 DPI at the final intended print size. A file that looks sharp on screen at screen resolution (72-96 DPI) will print soft and blurry. Build your files at print dimensions from the start rather than scaling up later.
File Format
PNG with a transparent background is the standard for DTG and print-on-demand production. Vector formats (AI, EPS, SVG) are preferred for screen printing and HTV, since they scale without quality loss and allow clean colour separation.
Colour Mode
RGB colour mode is correct for digital and DTG printing. Screen printing separations typically require CMYK or spot colour conversion, usually handled by the print provider. Confirm which mode is required before submitting final files.
Design Tools
Adobe Illustrator and Photoshop are the professional standards. For those without access, Canva handles basic design needs well and exports at acceptable resolution for most digital print methods. Inkscape is a free vector alternative that produces print-ready files when used correctly.
When You’re Ready to Move Beyond DIY
Home methods are a legitimate starting point, but most people who get serious about custom apparel eventually move toward a production partner. Working with a platform that handles printing, quality control, and fulfilment frees you to focus on design and brand building rather than managing equipment and material sourcing. If you’re at that stage, exploring what’s available in custom t-shirts through a dedicated platform gives you access to professional-grade output without the capital investment of owning the equipment yourself.
The key factors to evaluate in any production partner are print method (DTG vs screen printing vs DTF), minimum order quantities, turnaround time, branding options (custom labels, packaging), and integration with whatever e-commerce platform you’re using. A quick test order before committing to a full run tells you more than any specification sheet.
Choosing Your Method
Making your own shirts has never been more accessible, and the range of available methods means there’s a practical route for every situation. Single shirt for a gift? Iron-on transfer tonight. Selling designs online with no upfront cost? Print-on-demand is built for exactly that. Bold team kit in quantity? Screen printing at volume wins on price and durability. Complex artwork on any fabric type? DTG or DTF gets you there without the constraints.
The mistake most people make is choosing a method based on what sounds most professional rather than what actually fits their purpose. A print-on-demand setup run well will outperform an in-house DTG printer run poorly, in both quality and economics. Match the method to the job, get the technical basics right, and the results follow.